hack.lu 2019 - Open Pit challenge (cryto, rev)
I can't stand these craters that surface mines put in our landscape. It's time to stop them. I've managed to acquire the software running on their servers. Maybe you could use that to get in and disturb their operations?
The Open Pit challenge was my contribution to this year’s hack.lu CTF. As some people asked me for the solution of the challenge I've decided to create a writeup about it. If you want to follow along, here is the binary that was provided along with the challenge.
At the time of writing the challenge is still online (and hopefully will be for a while) via
nc openpit.forfuture.fluxfingers.net 1906
Solution
This challenge is a timing side-channel attack on a naive AES implementation. Solving it consists of two stages: The first stage is reverse engineering its binary to reveal hidden functionality and uncover the flaw in it's AES implementation. Stage two is the actual side-channel attack.
Reverse engineering the binary
The binary is stripped, so most functions in the program have no name. However, upon further inspection the there is a function (let's call it logger for now) that gets called from every other function. One parameter for that logger is a string that looks like it could be the original name of the calling function.
The logger itself is rather complex and it's purpose isn't immediately obvious. However, for now this is a nice tool to restore the name of many of the functions in the program. After we've renamed all the functions that reference our logger function, we're left with quite a few functions with interesting names. These include print_flag, login and encrypt_ecb.
While print_flag sounds promising, the function itself is rather boring. It merely loads the flag from a file and then immediately prints it to the console with no room for an exploit. Checking references to this function leads us to login.
The login function offers a few more interesting details. First there is only a single, hard coded login with the username admin. The password for this user is hard coded as well, however it's encrypted. The encrypted password is 95 22 28 f3 90 a6 0b d2 5d 61 dd 1e df 39 44 7b.
The password entered by the user is restricted to being exactly 16 characters long. The input is directly passed into the encryption function encrypt_ecb. Afterwards the result is compared to the encrypted password. If the passwords match, print_flag is called. The key used is loaded at program start from a file in the function load_key. As before the login function doesn't provide any vectors for exploitation.
Next up is the encryption function encrypt_ecb.

While the function name doesn't expose any information about what cryptographic function is used, this structure does look an awful lot like AES. AES is a widely used cryptographic routine so for now it's probably best to assume the cryptographic algorithm is safe and search for an easier attack vector.
The usual entry point to exploit a binary is wherever user input is processed. So let's have a look at that instead. To receive user input the main function calls the prompt function. That function again is pretty safe and returns the user input as C++ string.
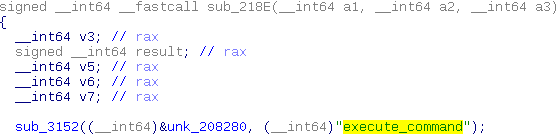
Following the flow of the user input leads us to the execute_command function. Again, this function cannot be exploited, but yields another bit of interesting information. The program contains two hidden commands: profiler_print and profiler_reset. Let's load up the challenge and see what they do.
Let's start with profiler_print. Invoking this command directly after launching the challenge yields the following output:
execute_command              1
load_key                     1
main                         1
prompt                       1
These seem to be the function names we found in the binary. Other than that this output isn't very informative right now. Let's try to invoke different functions to see what happens. After using the register command once the output changes to
execute_command              3
load_key                     1
main                         1
prompt                       3
register_user                1
We can observe two changes. The numbers behind execute_command and prompt increased. Also, there is a new function listed: register_user. This command seems to list all the functions that have been called by the program along with a count of how often they have been invoked. We can confirm this theory by invoking register once again.
execute_command              5
load_key                     1
main                         1
prompt                       5
register_user                2
As expected, the count on register_user increased by one. This also means that our logger function from before probably is a call to the profiler recording that a function got invoked. Knowing this let's try out profiler_reset. profiler_reset executes without printing any output. Since this call seems to be related to the profiler as well let's execute profiler_print again to see if something changed.
execute_command              1
prompt                       1
Most function calls have disappeared and execute_command and prompt are back down to one. This probably means that profiler_reset deletes all the data collected by the profiler.
Now that we know this let's reset the profiler and call login to see what functions are invoked by the AES function. For this attempt I used aaaaaaaaaaaaaaaa as password.
add_round_key               11
construct_round_keys         1
encrypt_ecb                  1
execute_command              2
gf_mult2                   288
gf_mult3                   144
gf_reduce                  154
login                        1
mix_columns                  9
prompt                       4
roundkey_g                  10
shift_rows                  10
sub_bytes                   10
That's quite a lot. Let's reset the profiler again and see if something changes when we use bbbbbbbbbbbbbbbb as password instead.
add_round_key               11
construct_round_keys         1
encrypt_ecb                  1
execute_command              2
gf_mult2                   288
gf_mult3                   144
gf_reduce                  144
login                        1
mix_columns                  9
prompt                       4
roundkey_g                  10
shift_rows                  10
sub_bytes                   10
The number of calls to gf_reduce seems to change depending on the input. This is a side channel that we can use to recover the used encryption key. Let's see how.
Recovering the encryption key using the side channel
As we've seen the number of calls to gf_reduce depends on the data that is getting encrypted (the password that the user tried to log in with). To find out how this information is useful we need to dig through the inner workings of AES a bit. First let's have a look at why the amount of calls to gf_reduce varies.
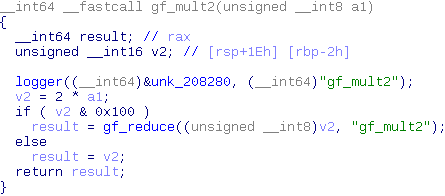
gf_mult2 is the only function that calls gf_reduce. The input of that function is a single byte and gf_reduce is only called if the most significant bit of that byte is set. To know where this byte comes from we have to take a look at what the structure of AES.
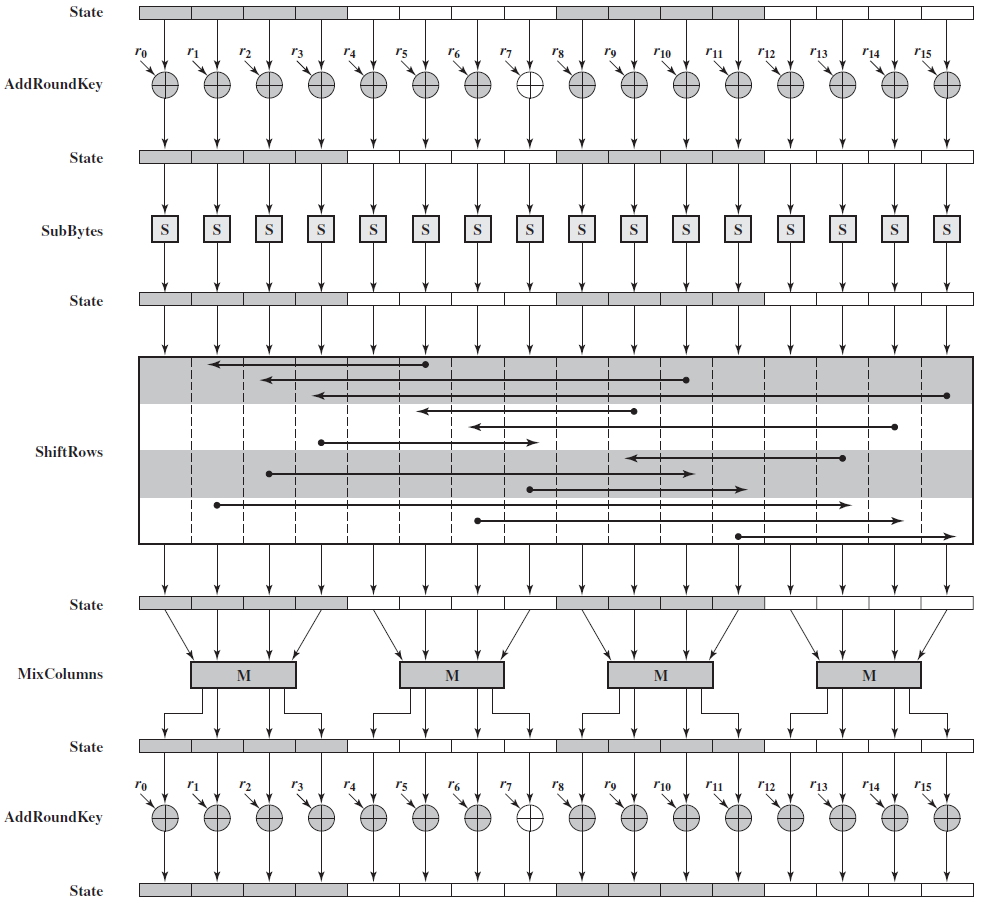
This graphic (original graphic by Jeongysu) depicts the first few calculations AES does. The key is added to the plaintext (AddRoundKey) followed by a full round of AES. More rounds will follow but that doesn't matter for our attack. The initial state is filled with the plaintext and each box represents one byte. The round key added in the first AddRoundKey operation is identical to the encryption key provided to AES.
As can be seen in the graphic for most of the algorithm each byte processed independently. Only the MixColumn step processes multiple bytes at a time.
MixColumn performs a matrix multiplication in a finite field:

This matrix multiplication can also be written as
b0 = a0 * 2 + a1 * 3 + a2 + a3
b1 = a0 + a1 * 2 + a2 * 3 + a3
b2 = a0 + a1 + a2 * 2 + a3 * 3
b3 = a0 * 3 + a1 + a2 + a3 * 2
The multiplications with 2 are performed by the gf_mult2 function we've seen before. This makes it clear that up to this point each byte has been processed independently of the other bytes. Four our attack this means that we do not need to attack the encryption key as a whole but can instead attack its bytes independently. This reduces our search space from 2^128 to 2^8.
The basic idea of the attack is this: if we know a single byte of the plaintext and the corresponding byte of the key we can calculate whether the most significant will be set for the parameter of the gf_mult2 function and thus whether gf_reduce will be called. Of course gf_reduce is also invoked by the other bytes and subsequent rounds. However, if we do this with multiple plaintexts and group them by whether they have their most significant bit set or not we can predict that the number of gf_reduce calls on average will be higher for the group with the msb set than for the group with the msb unset.
There is a catch though: We don't know the encryption key so the above won't work just like that. However, we have reduced the search space to 2^8 for every byte, so it's feasible to just try out every possibility. We can evaluate whether our guess is correct by grouping the tries by whether the most significant bit is set (as explained above) and checking whether the number of calls to gf_reduce is significantly above average.
The attack
Now let's actually execute the attack. I will only demonstrate it for the first byte of the key. To recover the full key the attack simply has to be executed once more for each byte to recover. First we need to collect some measurements from the server. This is done by connecting to it, trying to login as admin with a random password and then executing profiler_print. The random password and the number of invocations on gf_reduce are then stored as our first data point. The profiler can then be reset with profiler_reset and login can be executed anew with a new random password to collect the next data point. We do this until we have collected 6000 data points (I have no magic formula to tell how many are enough. Experience simply has shown that 6000 is usually enough to work well). We can now close the connection to the sever as we don't need to talk to it anymore until we know the correct password.
The following steps have to be done for each plaintext (the random passwords that we used) on it's first byte. We start by guessing that the key byte is 00 and do this for all the possibilities until reaching FF.
- Add the key guess (
00) to the plaintext byte. In the finite field of AES an addition equals the XOR operation, so we dostate = plaintext ^ key - Perform the
SubBytesoperation (this is a lookup in a hard coded lookup table that replaces the bytes value with a new one). - We skip the
ShiftRowsoperation. Doing it won't help with our attack. Even worse it'll scramble our key bytes so would have to bring them in the right order later on. Because of this, we just safe us the hassle of doing this operation in the first place.
We've now arrived at the MixColumns operation which will perform mult_2 on our byte. Because of this, we now group all the bytes into two groups. One has all the bytes (and the measured number of gf_reduce calls) that have their msb set (I'll call this the slow group because it has to execute more code) and the other group has all the bytes (with gf_reduce measurements) which don't have their msb set (I'll call this the fast group because they have to execute less code).
Now we average the number of gf_reduce calls in both groups. Then we subtract the average of the slow group from the average of the fast group. This new value tells us how much the average of those two groups are apart with key guess 00. We now repeat this process for all the other guesses until we reach FF. The key guess with the biggest difference should be the correct guess. Here is a plot of the data we generated:
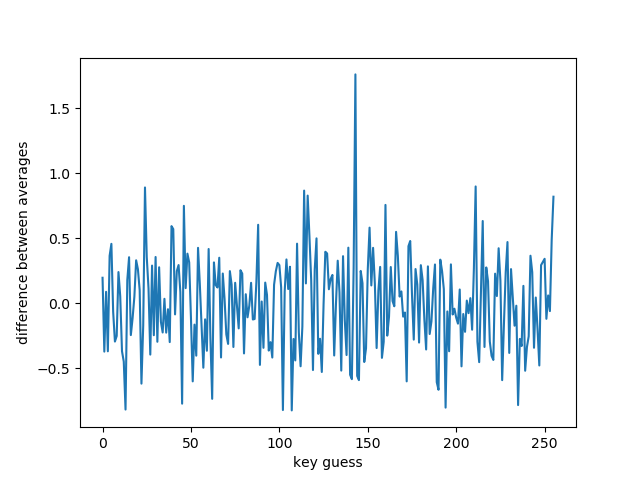
We are looking for the biggest value and one key guess (8F) is clearly standing out from the others. We can be fairly confident that this is the correct value for the first key byte.
By now simply doing the same process again for every other key byte we can restore the complete key:
8F 31 D2 39 C9 7F 5D 60 AC 29 91 EC 6B 8E DF 54
All that's left to do now is to decrypt the password, login and fetch the flag.